
Reels frame
Recommended1080×1920 9:16
Standard vertical frame for Reels video and cover stills. Design mid-frame first.
Use in toolInstagram · Image size
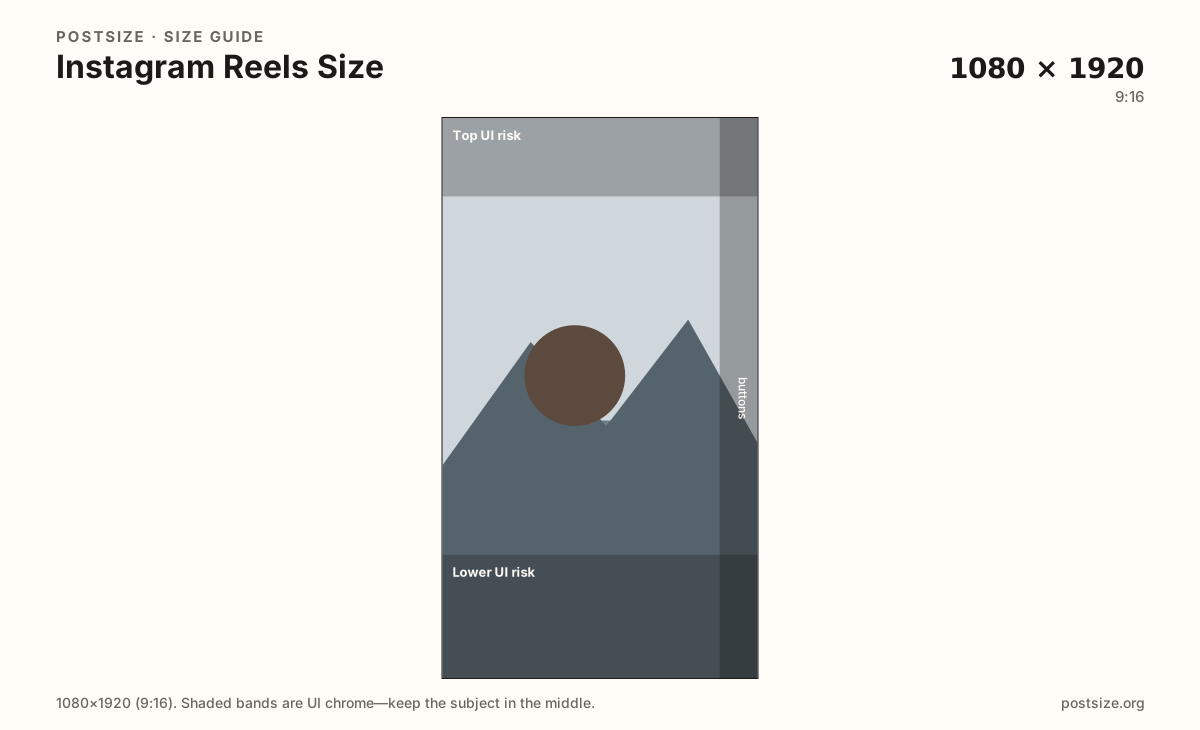
Reels fill the phone at 1080×1920. Keep faces out of the top and bottom UI bands, export a clear 9:16 cover frame in your browser, then match that framing when you edit the video—no signup.
Browser crop · stays on your device
1080 × 1920
Add a photo to crop
Upload a vertical frame—or try the sample—then keep the subject between the UI risk bands before you download the cover still.
Export 1080×1920, but treat the top and bottom strips as unsafe. Captions, audio chips, username, and action buttons cover the edges—design the mid-frame first, then bleed backgrounds full-bleed.
Export this for Instagram upload.
1080×1920 9:16
Standard vertical frame for Reels video and cover stills. Design mid-frame first.
Use in tool| Asset | Pixels | Ratio | Notes | Action |
|---|---|---|---|---|
| Reels frame Recommended | 1080×1920 | 9:16 | Standard vertical frame for Reels video and cover stills. Design mid-frame first. | Use in tool |
A Reel fills the phone, then Instagram draws captions, audio chips, username rows, and right-side action buttons on top. Edges that look fine in a desktop editor can vanish on-device the moment captions turn on. Treat those bands as reserved space—not optional decoration.
Cover stills matter as much as the video. The thumbnail people tap in Explore or your profile often comes from a single frame. Export that frame at 1080×1920 and keep the hero subject in the clear middle band so it still reads with UI overlays and at tiny thumbnail size.
Reels are also watched one-handed, often with sound off. Put the hook in the first second and keep on-screen text large enough to read without pausing. Dense paragraphs belong in the caption field, not stacked over the product. If you burn captions into the video, leave extra room under the mid-band.
When you repurpose Stories or TikTok frames, double-check Instagram’s button stack—same 9:16 pixels, different chrome. A layout that clears Story stickers can still collide with Reels captions and the like/share column. If the Reel also appears in the feed, protect the mid-frame first; never put the only logo in a corner that Explore thumbnails can trim.
Same 9:16 frame—captions and the right-side button stack hide edge-hugging subjects.
Tick these off against your crop preview—nothing is saved.
Similar-looking slots often use different ratios—do not reuse one export for all of them.
1080 × 1920
This page. Full-screen vertical with Reels UI overlays.
1080 × 1920
Same pixels; stickers and reply UI differ—re-check safe zones.
1080 × 1350
Shorter 4:5—not a full-screen Reel export. Re-crop from the source.
640 × 640 upload
Circular avatar in chrome, not the Reel art itself.
| Surface | Typical size | Note |
|---|---|---|
| Reels video / cover | 1080 × 1920 | This page. Full-screen vertical with Reels UI overlays. |
| Stories | 1080 × 1920 | Same pixels; stickers and reply UI differ—re-check safe zones. |
| Feed post | 1080 × 1350 | Shorter 4:5—not a full-screen Reel export. Re-crop from the source. |
| Profile photo | 640 × 640 upload | Circular avatar in chrome, not the Reel art itself. |
Treat the top band as reserved for username, audio, and navigation, and the bottom band as reserved for captions and CTA stacks. The right edge often holds like, comment, and share controls. Exact padding varies by device—design with margin, not pixel-perfect assumptions.
Guides on this page are approximate. Always confirm once inside Instagram with captions enabled and with the audio chip visible.
People decide to watch from a tiny thumbnail and the first beat of motion. Design the cover like a poster: one subject, one short line, high contrast. Then make sure the opening shot of the video matches that framing so the transition does not feel like a bait crop.
Brand accounts often overstuff the first frame with three headlines and a logo lockup. On a phone, that collapses into noise. One word or a clear product beat beats a flyer—especially when Instagram’s caption stack appears underneath.
There is no separate “cover-only” resolution. Export the same 1080×1920 vertical frame, keep the hero in the mid band, and choose that still as the cover when Instagram asks.
This tool crops still frames. For motion, match the same 1080×1920 safe zone in your video editor. JPG is fine for photo covers; PNG helps for flat graphics. Keep sRGB so colors do not shift after upload.
Upload a vertical (or any) still, lock the Reels preset at 1080×1920, then drag until the subject clears both UI risk bands. Download when only background sits in the unsafe top and bottom strips.
From this download to a live upload in a few minutes.
Download the 1080×1920 JPG for a cover still—or match this frame when editing video.
Open Instagram → Reels → upload your clip (and set the cover if prompted).
Add captions and stickers only after confirming the subject is still visible.
Preview once with captions on—auto captions can cover what looked safe in the crop tool.
Scrub the first second on your phone: the opening shot should match the cover framing, and the Explore thumbnail should still show the subject.
1080×1920 pixels (9:16). That is the standard full-screen vertical frame for video and cover stills—keep important content out of the top and bottom UI bands.
Keep it in the middle band. Top username/audio, bottom captions, and right-side buttons commonly cover edge text. Leave extra room if you will burn captions into the video.
Same pixels (1080×1920), different chrome. Stickers, captions, and action buttons differ—always re-check safe zones for each surface before you publish.
Instagram will pillarbox or crop it. Shoot or crop vertical 9:16 when you can so you control what stays in frame instead of letting the app decide.
It crops still cover frames. Match the same framing and safe zone when you export video from your editor so the opening shot matches the cover.
A clear mid-frame subject, short readable type, and a frame that still works with captions on. Avoid faces only in the top or bottom UI bands, and check the tiny Explore thumbnail.
Same as the Reel frame: 1080×1920 (9:16). Export a still at that size, keep the subject between the UI risk bands, then choose it as the cover in Instagram.
JPG for photographs; PNG for hard-edged graphics or type-heavy covers. Prefer sRGB either way, and keep the file light enough for mobile upload.